はじめに
ちょっと前に書いた記事でOAuth2認証を避けて通って使わないでGitHub APIにより取得できる情報を使ったアプリケーションの例として、自分がownerになっているGitHubのリポジトリをサイドバーに表示するウィジェットについて書きました。
そこで、この記事ではOAuth2認証の後でGitHub APIを実行した結果得られた情報と、OAuth2認証なしでGitHub APIを実行した結果得られた情報を比較した結果について書きます。また、GitHub APIの利用時にOAuth2認証を行うためにはGitHubのサイトでアプリケーションの登録を行う必要がありますので、それについても書きます。
比較の対象とする情報
この記事ではユーザの情報をOAuth2認証ありとなしの2通りの方法で取得して、その結果を比較してみます。
OAuth2認証なしの場合
OAuth2認証なしでのGitHub APIの実行結果はWebブラウザのアドレスバーにURLを入力すると確認できます。
例えば、以下のURLにアクセスする(末尾のスラッシュは不要です。)と…
以下のような結果が返されます(以下の結果はこの記事を最初に書いた時点(2019年3月)のものです。GitHubでの登録情報が変更されると、それに応じてAPIの実行結果も変化する場合があります)。
“login”: “pandanote-info”,
“id”: 29232018,
“node_id”: “MDQ6VXNlcjI5MjMyMDE4”,
“avatar_url”: “https://avatars3.githubusercontent.com/u/29232018?v=4”,
“gravatar_id”: “”,
“url”: “https://api.github.com/users/pandanote-info”,
“html_url”: “https://github.com/pandanote-info”,
“followers_url”: “https://api.github.com/users/pandanote-info/followers”,
“following_url”: “https://api.github.com/users/pandanote-info/following{/other_user}”,
“gists_url”: “https://api.github.com/users/pandanote-info/gists{/gist_id}”,
“starred_url”: “https://api.github.com/users/pandanote-info/starred{/owner}{/repo}”,
“subscriptions_url”: “https://api.github.com/users/pandanote-info/subscriptions”,
“organizations_url”: “https://api.github.com/users/pandanote-info/orgs”,
“repos_url”: “https://api.github.com/users/pandanote-info/repos”,
“events_url”: “https://api.github.com/users/pandanote-info/events{/privacy}”,
“received_events_url”: “https://api.github.com/users/pandanote-info/received_events”,
“type”: “User”,
“site_admin”: false,
“name”: “pandanote-info”,
“company”: null,
“blog”: “https://pandanote.info/”,
“location”: “Yokohama, Japan”,
“email”: null,
“hireable”: true,
“bio”: “write a blog which describes some computer tips and tricks mainly in Japanese.”,
“public_repos”: 7,
“public_gists”: 67,
“followers”: 0,
“following”: 0,
“created_at”: “2017-06-06T14:26:53Z”,
“updated_at”: “2019-02-06T14:41:42Z”
}
簡単ですね。🙂
OAuth2認証ありの場合
一方、OAuth2認証による認証後にGitHub APIを実行するには、OAuth2認証のために必要な情報をGitHubに登録し、Client IDとClient Secretを取得する必要があります。
アプリケーションの登録
アプリケーションの登録は以下の手順で行います。
- GitHubにログインします。
- 画面右上のアバターのアイコンをクリックすると表示されるメニューから「Settings」を選択します。
- 左側のメニューから「Developer Settings」を選択します。
- 画面が切り替わりますので、左側のメニューから「OAuth Apps」を選択します。
- 画面右側の「New OAuth App」ボタンを押します。
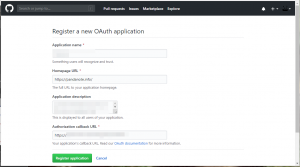
- 「Register a new OAuth application」画面が表示されますので、必要事項を入力します。なお、コールバック用のURLにはアクセス可能なものを指定します。
- 必要事項が入力できたら、「Register Application」ボタン(下図の緑色のボタン)をクリックします。
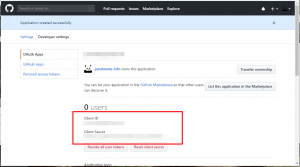
- 登録に成功すると画面が切り替わり、Client ID及びClient Secretが表示されます(下図の赤枠内)ので、OAuth2認証時に必要に応じて使用します。
request_oauthlibのインストール
Python3でOAuth2の認証についての情報を取り扱うためのパッケージとして、request_oauthlibをインストールします。
request_oauthlibはroot権限で以下のコマンドを実行するとインストールできます。
スポンサーリンク
Python3の対話モードで確認
参考文献の記述を参考にして対話モードで動かせるかどうかを以下の手順で確認します。
- シェルのコマンドプロンプトで以下のように入力してEnterキーを押し、対話モードでPython3を起動します。
$ python3
Python 3.7.1 (default, Nov 5 2018, 14:07:04)
[GCC 8.2.1 20181011 (Red Hat 8.2.1-4)] on linux
Type “help”, “copyright”, “credits” or “license” for more information.
>>> - 対話モードで以下のように入力します。なお、以下の例ではauthorize APIの発行時にscopeとしてuser及びgistを設定しています。複数のscopeを指定する際にはスペースで区切る(URL的には’%20’で区切る)点には注意が必要です。また、参考文献の例はPython2用のコードですが、以下の入力例ではPython3で実行できるようにコードの一部を変更しています。
>>> client_id = ‘<the id you get from github>’
>>> client_secret = ‘<the secret you get from github>’>>> # OAuth endpoints given in the GitHub API documentation
>>> authorization_base_url = ‘https://github.com/login/oauth/authorize?user%20gist’
>>> token_url = ‘https://github.com/login/oauth/access_token’>>> from requests_oauthlib import OAuth2Session
>>> github = OAuth2Session(client_id)
>>> # Redirect user to GitHub for authorization
>>> authorization_url, state = github.authorization_url(authorization_base_url)
>>> print(‘Please go here and authorize,’, authorization_url) - 手順2の最後のコマンドが正常に実行されると以下のように表示されるので、適当なブラウザを用いて指示されたURLにアクセスします。
Please go here and authorize, https://github.com/login/oauth/authorize?scope=user+gist&response_type=code&client_id=<client id>&state=<state>
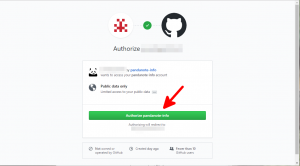
- 以下のような画面が表示された場合には、「Authorize」ボタン(下図の赤矢印)を押す。
- OAuthアプリケーションの登録時にcallback先として指定したURLにリダイレクトされますので、そのURLをどこかにコピーしておきます。
- Python3の対話モードに戻り、以下のように入力します。すると、URLの入力を求められますので、手順5でコピーしておいたURLをペーストし、Enterキーを押します。
>>> redirect_response = input(‘Paste the full redirect URL here:’)
Paste the full redirect URL here:スポンサーリンク - 以下のように入力し、Enterキーを押します。
>>> github.fetch_token(token_url, client_secret=client_secret, authorization_response=redirect_response)
- 以下のようなレスポンスが返されますので、アクセストークンは他のファイル等にコピーしておきます。
{‘access_token’: ‘some access token’, ‘token_type’: ‘bearer’, ‘scope’: [‘gist,user’]}
- ここまでの手順でOAuth2による認証が完了しましたので、以下のように入力してEnterキーを押します。
>>> r = github.get(‘https://api.github.com/users/pandanote-info’)
- 以下のコマンドを実行して、返された文字列を確認します。
>>> print(r.content)
- 実行結果は以下の通りとなります。なお、可読性を高めるために改行を入れています。
b'{
“login”:”pandanote-info”,
“id”:29232018,
“node_id”:”MDQ6VXNlcjI5MjMyMDE4″,
“avatar_url”:”https://avatars3.githubusercontent.com/u/29232018?v=4″,
“gravatar_id”:””,
“url”:”https://api.github.com/users/pandanote-info”,
“html_url”:”https://github.com/pandanote-info”,
“followers_url”:”https://api.github.com/users/pandanote-info/followers”,
“following_url”:”https://api.github.com/users/pandanote-info/following{/other_user}”,
“gists_url”:”https://api.github.com/users/pandanote-info/gists{/gist_id}”,
“starred_url”:”https://api.github.com/users/pandanote-info/starred{/owner}{/repo}”,
“subscriptions_url”:”https://api.github.com/users/pandanote-info/subscriptions”,
“organizations_url”:”https://api.github.com/users/pandanote-info/orgs”,
“repos_url”:”https://api.github.com/users/pandanote-info/repos”,
“events_url”:”https://api.github.com/users/pandanote-info/events{/privacy}”,
“received_events_url”:”https://api.github.com/users/pandanote-info/received_events”,
“type”:”User”,
“site_admin”:false,
“name”:”pandanote-info”,
“company”:null,
“blog”:”https://pandanote.info/”,
“location”:”Yokohama, Japan”,
“email”:null,
“hireable”:true,
“bio”:”write a blog which describes some computer tips and tricks mainly in Japanese.”,
“public_repos”:7,
“public_gists”:67,
“followers”:0,
“following”:0,
“created_at”:”2017-06-06T14:26:53Z”,
“updated_at”:”2019-03-22T11:08:24Z”,
“private_gists”:4,
“total_private_repos”:0,
“owned_private_repos”:0,
“disk_usage”:330,
“collaborators”:0,
“two_factor_authentication”:false,
“plan”:{“name”:”free”,
“space”:976562499,
“collaborators”:0,
“private_repos”:10000}}’
得られた情報の比較
OAuth2認証ありの場合に得られる情報としては、OAuth2認証なしの場合に得られる情報に加えて、以下の情報を得ることができるようです。
- “private_gists”
- “total_private_repos”
- “owned_private_repos”
- “disk_usage”
- “collaborators”
- “two_factor_authentication”
- “plan”
- “name”
- “space”
- “collaborators”
- “private_repos”
上記の出力結果ではprivateなgistの件数が出力されていますが、Gistは公開時にprivateで公開することを選択した場合でもURLがわかっていればアクセスできてしまう(本Webサイトでもprivate公開しているGistを普通に貼り付けています。)ものであることと、この記事を最初に書いた時点(2019年3月)では特にprivateにすべきファイルをGistに置いているということはない(むしろ公開時によくわからないままprivateに設定してしまったもので、そもそもpublicで設定してもよいものでした。)ので、特に隠すことなく公開することとしました。
まとめ
GitHub APIは改廃が頻繁に行われるせいかどうかはわかりませんが、実行した結果得られる情報についての情報のドキュメント化が十分でないと思ったので、この記事を書くこととしました。アプリケーションの開発の参考にしていただければ幸いです。
この記事で取得したアクセストークンを使うとOAuth2認証が必要なデータにアクセスできるようになるようですが、これについては別の機会に試そうと考えています。
この記事は以上です。
 GitHub APIを使って、GitHub上の自分のリポジトリの一覧を表示する簡易なウィジェットを作ってみた。
 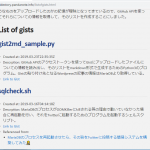 GitHub APIを使ってGistにアップロードしたファイルのリストにひと手間かけたものを表示するページを作ったところ、割といいもの(本Webサイト比)ができた件。
  GitHub Pagesのトップページの記事一覧をMariaDBの力を借りて作成日時と最終更新日時(のようなもの)順に並べてみた。
  GitHub Pagesで構築したWebサイトのURLをAmazonアソシエイトに追加登録の申請をしたところ、3回目の申請で追加が承認された件。